Have you encountered redundant hostnames error notifications on google analytics? We will show you how you can fix it in a quick and easy way.
Redundant hostname notifications come in Google Analytics when the Google result returns two or more variations of the website page the user searches. It happens when Google considers a single website as two different entities even if the content is the same. For example, if the user searches for Techstricks.com, then Google will track and return www.Techstricks.com as well as Techstricks.com as two independent websites.
This causes redundant hostnames error notification to pop in your google analytics. If your site is accessible with multiple hostnames, Search Engines will have a hard time figuring out unique content from your site and index it
To fix this error follow the below two steps.
1. Apply a filter in Google Analytics for Redundant Hostnames
This step is really easy and quick to fix the issue of redundant hostnames error. Follow the steps below to make the changes by applying a filter in google analytics.
- First login to your Google Analytics account. Then go to the Admin section.
- Click on Filters on the 3rd column VIEW, then click the red button + Add Filter.
![Redundant Hostnames Google Analytics Notification [RESOLVED]](https://techstricks.com/wp-content/uploads/2021/04/analytics-steps-1-1024x488.jpg)
- Enter “Consolidate hostnames” as name and select Custom for filter type
- From the radio button list select Search and replace
To add the next field inputs, you would need to decide which would be your main domain hostname preference, with WWW or without WWW. Below are the instructions for applying in both the cases:
Converting WWW to non-www
- Filter Field: Hostname
- Search String: ^www\.
- Replace String: leave it empty
Converting non-www to WWW
- Filter Field: Hostname
- Search String: ^yourdomain\.com$
- Replace String: www.yourdomain.com
- Verify the Filter: Click on the link given ‘verify this filter’.
- Save the Filter settings and you are done.
The above steps will solve the redundant hostnames issue on Google analytics. However, we recommend you follow the step below to solve the issue of two URLs.
2. Fixing with 301 directs
A simple way to do this is by adding a 301 redirect rule to your .htaccess file.
The steps below may be technical, if you can’t locate your files, ask your web developer or hosting provider, they should be able to help you without a problem.
Fix Redundant Hostnames for Apache Server – .htaccess
To access your .htaccess file, you should go to the root directory in your Cpanel “Exampledomain.com/cpanel”. Sometimes you have to check “show hidden files”.
Once you locate the file add the following lines at the beginning of the file.
Redirect WWW to non-www
RewriteEngine On # This line may already exist # Rewrite all requests to the 'www' version
RewriteCond %{HTTP_HOST} ^www.example.com [NC]
RewriteRule ^(.*)$ http://example.com/$1 [L,R=301]
Redirect non-www to WWW
RewriteEngine On # This line may already exist # Rewrite all requests to the 'www' version
RewriteCond %{HTTP_HOST} ^mydomain\.com$ [NC]
RewriteRule ^.*$ http://www.mydomain.com%{REQUEST_URI} [R=301,L]Fix redundant hostnames on Nginx
Once you find the configuration file ad the below lines
Redirect WWW to non-www
server {
  server_name www.example.com;
  rewrite ^/(.*)$ http://example.com/$1 permanent;
}
Redirect non-www to WWW
server {
  server_name example.com;
  rewrite ^/(.*)$ http://www.example.com/$1 permanent;
}
Fix Redundant Hostnames with WordPress/PHP
In case you can’t access your configuration files you can use PHP code as below:
Redirect WWW to non-www
<?php
if ($_SERVER['HTTP_HOST'] == 'www.example.com'){
header("Location: http://example.com".$_SERVER['REQUEST_URI']);
}
?>Redirect non-www to WWW
<?php
if ($_SERVER['HTTP_HOST'] != 'www.example.com'){
header("Location: http://www.example.com".$_SERVER['REQUEST_URI']);
}
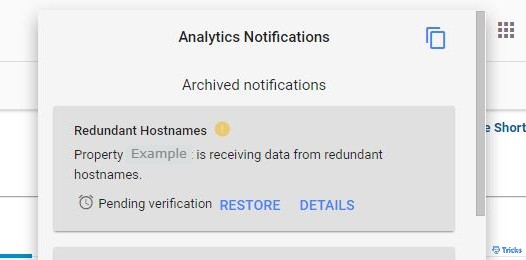
?>After you have done all the above changes, go back to Google analytics to check if the changes are done.
- Click on the Check again link from the notification you received earlier.
- This will change the status to Pending verification.
- And after Google Analytics confirms that everything is ok the notification will change to Resolved.
Follow all the above steps an the issue will be resolved.
If you like this blog, do share it with others. Comment below your thoughts about the article.
![Redundant Hostnames Google Analytics Notification [RESOLVED]](https://techstricks.com/wp-content/uploads/thumbs_dir/Untitled-p6bezkidqkhmahd6fknt5zwp21grtgtutlj47t8zss.jpg)
![Redundant Hostnames Google Analytics Notification [RESOLVED]](https://techstricks.com/wp-content/uploads/thumbs_dir/magento-p6c7u5cn3k84fqrsv06yoeyq1ofxpwwym33yj7c6rg.jpg)


